Connect a new front-end application
Prerequisites
Create a developer account in the Developer Console.
Step 1: Connect frontend through Developer Console
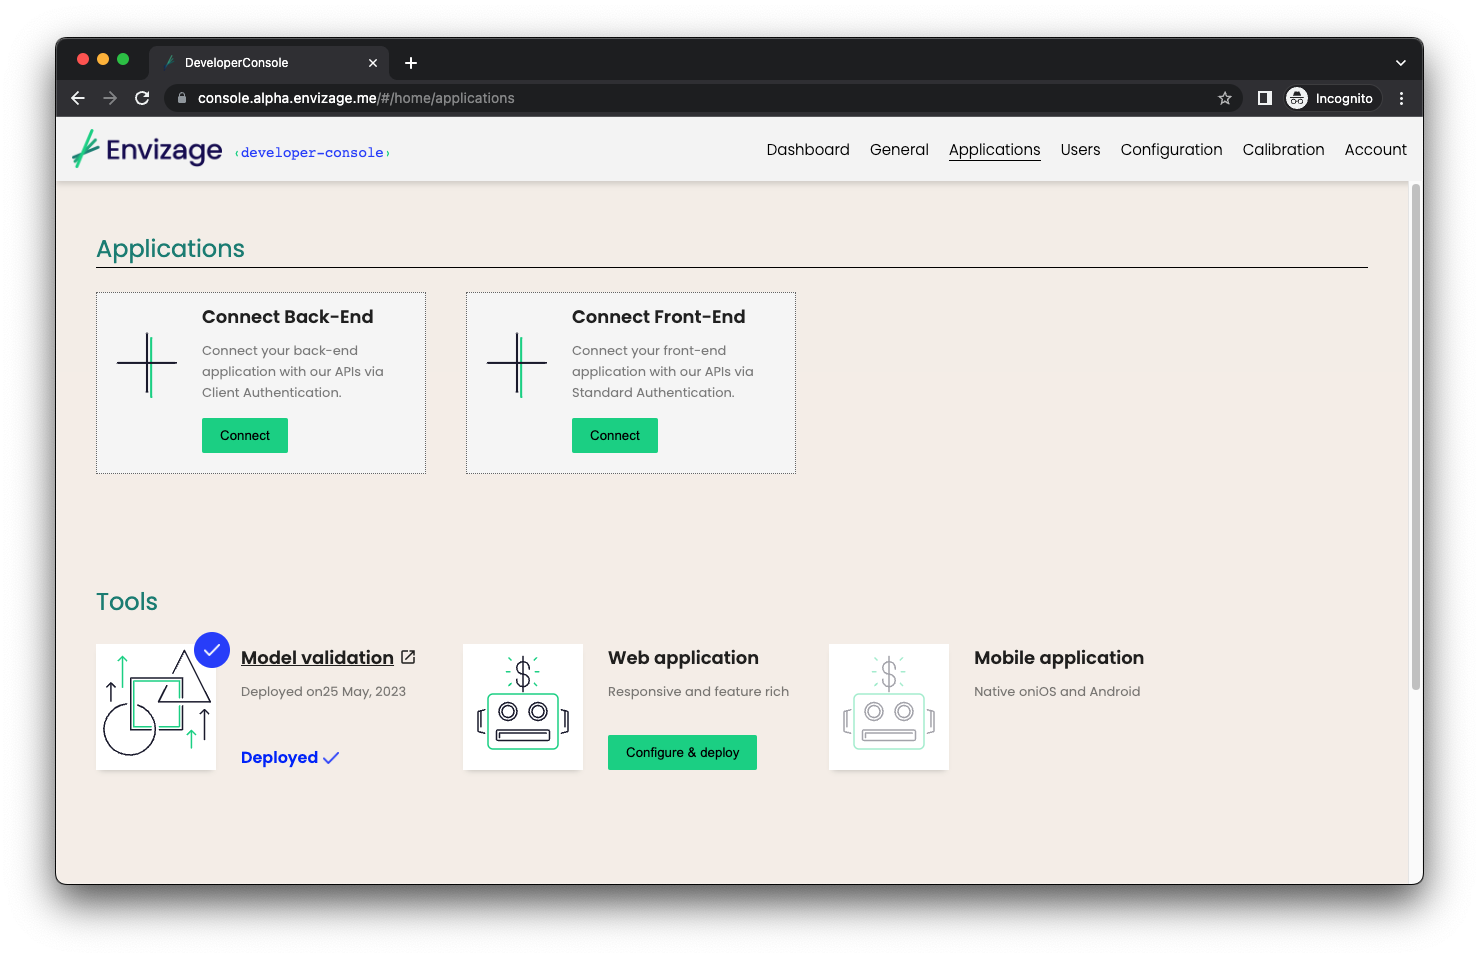
To connect a new frontend from Developer Console, navigate to Applications page from the main navbar and then click on Connect button inside the Connect Front-End box.

Step 2: Configure the app
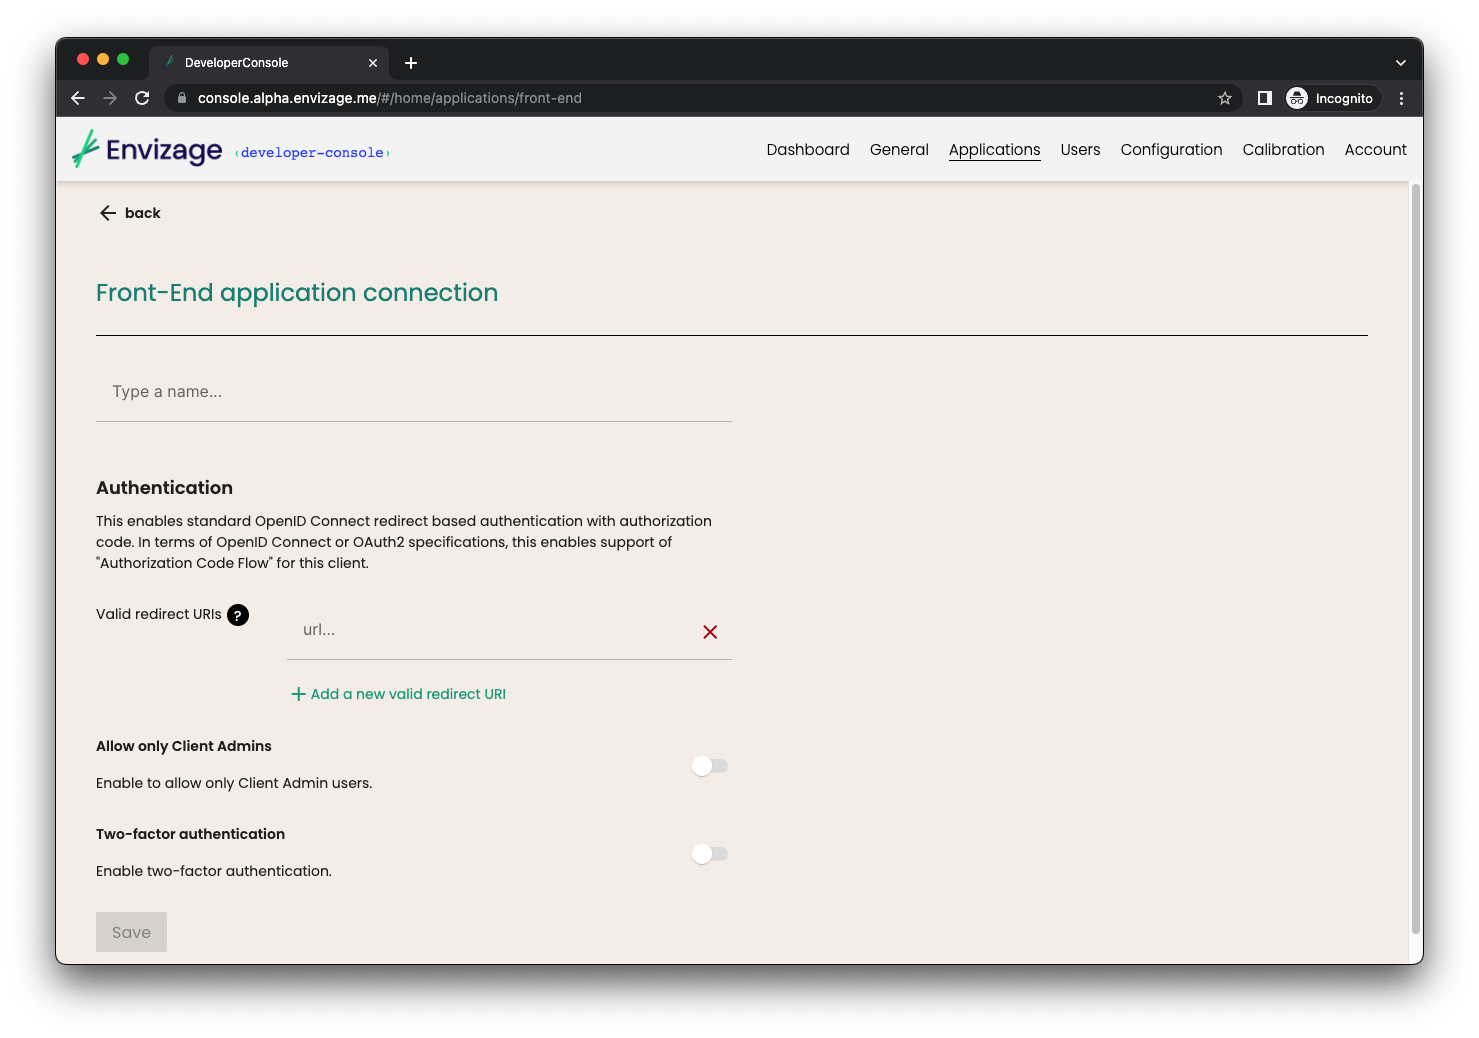
After clicking on connect button, you will need to configure the new app. You will be asked to type a name for the app, set the valid redirect URIs (URI pattern that a browser can redirect to after a succesful login) and enable or disable the allow only Client Admins (disabled by default).

Step 3: Client ID and Issuer URL
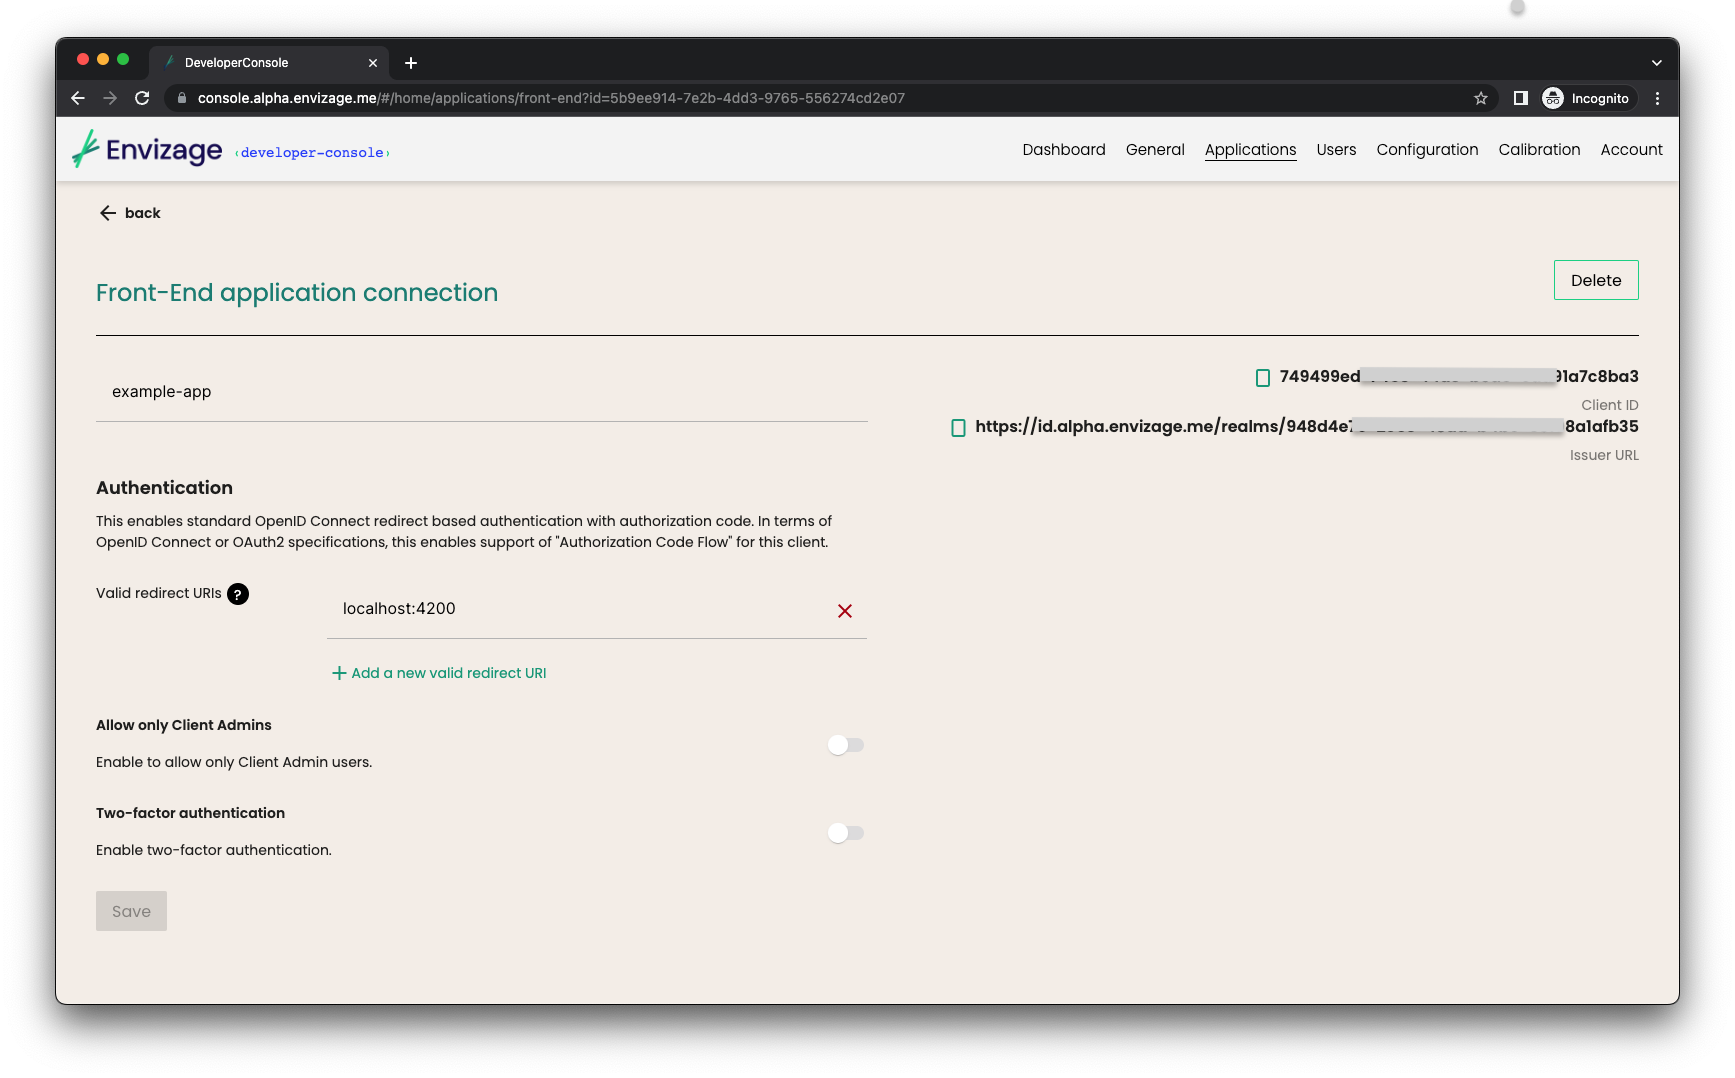
After saving, a client ID and issuer URL will be produced. Client ID and issuer URL are mandatory for setting up your front-end app.

Examples
Prerequisites
Create a developer account in the Developer Console and follow previous steps in order to get issuer URL and client id values.
User authentication
- Angular
- React
- Vue
Create a new Angular application
Create a new Angular application using the Angular CLI by running the following command in your terminal:
ng new my-app
Learn more here.
Install the OIDC library
In order to implement OpenId Connect/OAuth2 in an Angular project, we are going to use an OIDC client. Installangular-oauth2-oidc library by running the following command in your terminal:npm install angular-oauth2-oidc --save
yarn add angular-oauth2-oidc
Authentication configuration
In order to implement runtime configuration, create and add a configuration file to /src/assets folder. This file should contain the authentication configuration properties such as issuer, clientId, scope, response type etc. Issuer and clientId should be replaced with the corresponding values that have been produced in Developer console.Consequently, create a configuration service by using Angular CLI command ng g s configuration. This service will be injected whenever you need the configuration values.
- app.config.json
- app.config.service.ts
{
  "apiUrl": {{API_URL}},
  "oAuthConfig": {
    "issuer": {{Issuer_URL}},
    "clientId": {{Client_ID}},
    "scope": "openid",
    "responseType": "code",
    "strictDiscoveryDocumentValidation": false
  }
}
import { Injectable } from '@angular/core';
import { HttpClient } from '@angular/common/http';
import { of } from 'rxjs';
import { map } from 'rxjs/operators';
import { environment } from '../../environments/environment';
import { AuthConfig } from 'angular-oauth2-oidc';

export interface IConfig {
  apiUrl: string;
  backendUrl: string;
  keycloak: {
    url: string,
    realm: string,
    clientId: string
  },
  oAuthConfig: AuthConfig
}

@Injectable()
export class AppConfigService {

  private appConfig;
  constructor(private http: HttpClient) {}

  public resolve() {
    if (this.appConfig) {
      return of(this.appConfig);
    }
    return this.http
      .get('assets/app.config.json')
      .pipe(
        map(c => {
          this.appConfig = c;
          return c;
        })
      );
  }

  public getConfig(): IConfig {
    return this.appConfig || environment;
  }
}
User authentication flow
Use the services and methods that angular-oauth2-oidc library provides in order to configure the authentication client (using the configuration service from previous step), load the discovery document and redirect to provider's login page. SetupAutomaticSilentRefresh() will setup up silent refreshing for when the token is about to expire, while OAuthService events informs about events, for instance when a token has been received. After a succesfull login or an event firing, we call handleLogin() where you can load user's profile and store user's info such as name, access token etc.
- app.component.ts
import { Component } from '@angular/core';
import { Router } from '@angular/router';
import { AppConfigService } from './services';
import { filter } from 'rxjs';
import { Constants } from './app.constants';
import { AuthConfig, OAuthEvent, OAuthService } from 'angular-oauth2-oidc';

@Component({
  selector: 'app-root',
  templateUrl: './app.component.html',
  styleUrls: ['./app.component.scss']
})
export class AppComponent {

  constructor(
    private router: Router,
    private configService: AppConfigService,
    private oauthService: OAuthService
  ) {
    configService.resolve().subscribe(() => {
        const oAuthConfig: AuthConfig = {
          ...this.configService.getConfig().oAuthConfig,
          redirectUri: window.location.origin + '/'
        };
        oauthService.configure(oAuthConfig);
        this.oauthService.loadDiscoveryDocumentAndLogin().then(r => {
            this.handleLogin();
            this.router.navigate(['/home']);
          });
        this.oauthService.setupAutomaticSilentRefresh();
        this.oauthService.events.pipe(
            filter((e: OAuthEvent) => e.type === 'token_received')
          ).subscribe((e: OAuthEvent) => this.handleLogin());
      });
  }

  handleLogin = () => {
    this.oauthService.loadUserProfile()
      .then(p => localStorage.setItem(Constants.LOCAL_STORAGE_FIRST_NAME, p['info']['given_name'] || ''));
  };
}
Create a new React application
Create a new React application by running the following command in your terminal:
npx create-next-app
Learn more here.
Install NextAuth.js library
NextAuth.js is a completely secured authentication solution for implementing authentication in Next.js applications. Execute the following command to install NextAuth.js:
npm install next-auth
yarn add next-auth
Adding provider to NextAuth.js
NextAuth.js has a concept of providers, which define the services that can be used to sign in a user, such as email, OAuth or Keycloak. Create a file named [...nextauth].js in pages/api/auth . Inside this file we configure a custom provider and implement the callback methods as well.
Then in _app_.js we wrap the application with the Provider component from NextAuth.js and pass in the session page prop. By wrapping our component in a Session Provider, we enable session state to be shared between pages.
NextAuth.js provides the useSession React Hook, which can be used to check the user login status, get the session data and conditionally rendering. In protected.js file we use the useSession hook to check if user is authenticated and alsosignIn() and signOut() functions to sing in a user and sign out a signed-in user.
- [...nextauth].js
- app.js
- protected.js
    import NextAuth from "next-auth/next";

    export const authOptions = {
      site: process.env.NEXTAUTH_URL,
      providers: [
        {
          id: "custom",
          name: "custom_provider",
          type: "oauth",
          wellKnown: "{{Issuer_URL}}/.well-known/openid-configuration",
          issuer: {{Issuer_URL}},
          clientId: {{Client_ID}},
          clientSecret: {{Client_secret}},
          authorization: {
            params: {
              scope: "openid"
            }
          },
          profile(profile) {
            return {
              id: profile.sub,
              name: profile.name,
              email: profile.email,
            }
          },
        }
      ],
      callbacks: {
        async redirect(url, baseUrl) {
          return 'http://localhost:3000/protected';
        },
        async jwt({ token, account }) {
          if (account) {
            token.accessToken = account?.access_token
          }
          token.userRole = "admin"
          return token
        },
        async session({ session, token, user }) {
          if (token?.accessToken) {
            session.accessToken = token.accessToken;
          }
          return session
        }
      }
    }

    export default NextAuth(authOptions)
import '@/styles/globals.css'
import { SessionProvider } from "next-auth/react"

export default function App({
  Component,
  pageProps: { session, ...pageProps }
}) {
  return (
    <SessionProvider session={session}>
      <Component {...pageProps} />
    </SessionProvider>
  )
}
import { useSession, signIn, signOut } from "next-auth/react";

export default function ProtectedPage() {
  const { data: session, status } = useSession()

  const logout = () => {
    localStorage.clear()
    signOut("custom")
  }

  if (session) {
    return (
      <div>
        <h1>Protected page</h1>
        <p>This is a protected route.</p>
        <button onClick={() => logout()}>Sign out</button>
      </div>
    )
  }
  return (
    <div>
      <p>You need to be signed in to view this page.</p>
      <button onClick={() => signIn("custom")}>Sign in</button>
    </div>
  )
}
Create a new Vue application
Create a Vue.js application by running the following command in your terminal:
npm init vue@latest
Learn more here.
Install the OIDC library
Oidc-client-ts is a library that provides OpenID Connect (OIDC) and OAuth2 protocol support for client-side, browser-based JavaScript client applications. Also included is support for user session and access token management. Execute the following command to install the library:
npm install oidc-client-ts --save
yarn add oidc-client
Create an authentication plugin
In order to trigger the authentication flow and use authentication methods (login, logout etc) and data, we need to add the user authentication functionality at a global level. One approach to add global-level functionality to Vue.js is using plugins, which take advantage of Vue's reactive nature. In the case of user authentication, a Vue.js plugin lets you create a reusable and reactive wrapper around the authentication provider, making it much easier to work with the asynchronous methods of the SDK.
Create a file named
auth.plugin.js and inside create an export default with an install method. Install method has two arguments, the first one coming from Vue's createApp method and the second one concerns of any options passed in when adding the plugin to Vue instance. In this case we will pass the configuration options that we need in order to create a user manager. Inside install method we create a new user manager (provided by OIDC library), use getUser method and check the URL if user is authenticated. If user is authenticated, we set the global property isAuthenticated to true, so every app's component can be updated. By using a mixin, we make logout and login method available anywhere in the app. A component then is able to inject and use mixin's methods. Finally, to actually insert this plugin into the Vue app, go into main.js file and use app.use().- main.js
- auth.plugin.js
- App.vue
import { createApp } from 'vue'
import App from './App.vue'
import AuthPlugin from './plugins/plus.auth.plugin'
import { WebStorageStateStore } from "oidc-client-ts";

const clientConfig = {
  authority: {{Issuer_URL}},
  client_id: {{Client_ID}},
  redirect_uri: {{Redirect_URL}},
  response_type: 'code',
  scope: 'openid',
  loadUserInfo: true,
  userStore: new WebStorageStateStore({ store: window.localStorage }),
}

const app = createApp(App)
app.config.globalProperties.$isAuthenticated = false;
app.use(AuthPlugin, clientConfig)
app.mount('#app')
import { UserManager } from "oidc-client-ts";

export default {
  install: (app, clientConfig) => {
    const auth0Client = new UserManager(clientConfig)
    auth0Client.events.addUserLoaded((user) => {
      localStorage.setItem('access_token', user?.access_token)
      app.config.globalProperties.$isAuthenticated = true;
    })
    auth0Client.getUser().then(user => {
      if (!user &&
        window.location.href.split('?').length>1 &&
        window.location.href.split('?')[1].includes('code')
      ) {
        auth0Client.signinRedirectCallback()
          .then(() => app.config.globalProperties.$isAuthenticated = true)
      }
    })

    app.mixin({
      methods: {
        logout() {
          localStorage.clear();
          auth0Client.signoutRedirect()
        },
        login() {
          auth0Client.signinRedirect()
        },
      },
    })
  }
}
<template>
  <div>
    <button v-if="this.$isAuthenticated" @click="this.login">Login</button>
    <button v-if="!this.$isAuthenticated" @click="this.logout">Logout</button>
  </div>
</template>

<script>
  export default {
    name: 'App',
    inject: ['logout', 'login'],
  }
</script>